Hello BIMfans,
After considering the Type Trouble I have been having when looking at my doors, I decided put some more work into Architectural Model. This week I have tried to give my attic some attention, so it was time to get up the ladder and have another look.
If any of you reading know me, you’ll know that I’m no da Vinci; so I apologise in advance for the quality of the sketch below. To develop my Architectural model, I decided to first draw out a few of my key junctions, measure the relevant elements, and then produce my information model.
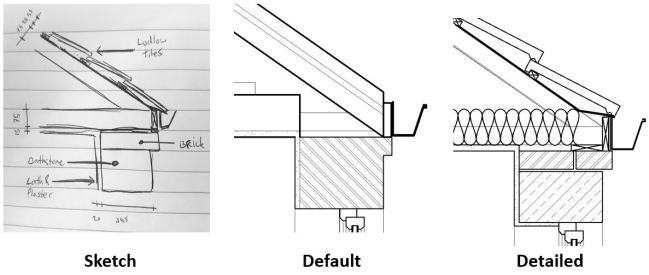
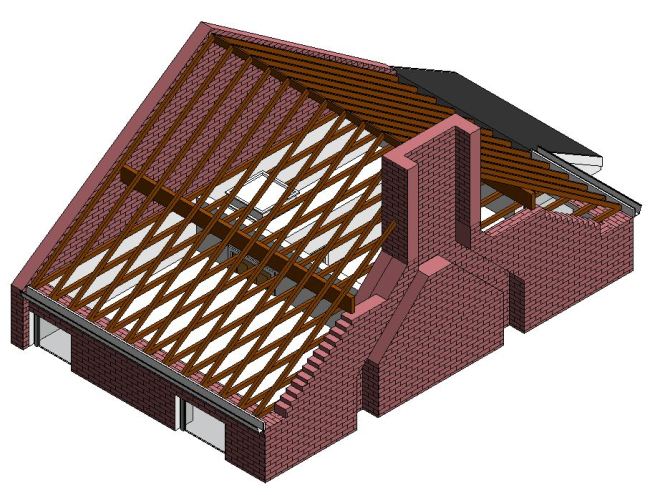
The reason I developed my graphical model this way was to limit the amount of overall modelling that I needed to do. I’ve discussed Level of Definition before as I am a firm believer of modelling as efficiently as possible. For example, to limit the amount of modelling I need to do for my roof I have set a number of informal ‘volumes’ within the roof itself using Revit’s built-in system family layering function:
So what is a Volume? Well thanks to the BRE Terminology tool, a volume as described within PAS1192-2 is:
Manageable spatial subdivision of a project, defined by the ‘project team’ as a subdivision of the overall project that allows more than one person to work on the project models simultaneously and consistent with the analysis and design process.
While formal volumes can acting as a tool for simultaneous working, I have also used informal volumes to limit the amount of modelling required. Each volume, as a subdivision of a project, is effectively a geometric space assigned for a particular system, element or array of components to be populated within. Typically, as the design develops these volumes can then be assigned to sub-consultants who would then populate them with their objects.
Therefore these informal volumes I have created for myself can be used in two ways.
- As a substitution for objects. For example, it would be practically impossible to model each roof tile and batten, so instead volumes are used. This also applies to other elements such as Walls (who’d model every brick?); and
- As a placeholder for objects. For example, my rafter volume was drawn initially as a substitution, but this week I have added them to my model. If objects are placed within their respective volumes, then a clash free model can be created as any clashes that may occur within this volume are ‘known’.

Finally, to sort my attic I also had to have a look at my party wall. Now very interestingly my party wall isn’t fully constructed (apparently this was fairly common when terraces like mine were constructed). This along with its annoying complex interesting profile has allowed me to generate some unique geometry to complete my attic.
By completing both of these elements of work I have also been able to generate another Stereo Panorama, with my partially constructed party wall providing a convenient light source when it was rendered (thank you Victorian builders?).
And there you have it, by exercising some attic-tion to detail (sorry!) I have now captured the geometry of my attic, as well as some useful elements that will aid future posts such as the amount of loft insulation and my half constructed party wall. Now that my Attic is sorted, I wonder which other parts of my Architectural model also need to be optimised before I can consider it complete…

[…] PLQ2.5 -Attic-tion to Detail […]
LikeLike
[…] PLQ2.5 -Attic-tion to Detail […]
LikeLike